 を病すと、レコ〖ディングのダイアログが附れます。ここで、峡茶したいファイルのフォ〖マットを联びます。タイムラインに木儡淡峡することはできません。あなたがファイルに淡峡すると、ソフトウェアが极瓢弄にレコ〖ディングをタイムラインに沤り烧けます。to bring
up the record dialog. Here you select a format for the file you want to
record to. You can't record directly to the timeline. You record to a file
and the software automatically pastes your recording on the timeline.
を病すと、レコ〖ディングのダイアログが附れます。ここで、峡茶したいファイルのフォ〖マットを联びます。タイムラインに木儡淡峡することはできません。あなたがファイルに淡峡すると、ソフトウェアが极瓢弄にレコ〖ディングをタイムラインに沤り烧けます。to bring
up the record dialog. Here you select a format for the file you want to
record to. You can't record directly to the timeline. You record to a file
and the software automatically pastes your recording on the timeline.
峡茶ボタンYou can record any combination of audio and video but only one track of video at a time. Specify the parameters of a file to record to then hit Do it. Most users have trouble understanding the format settings, which is why Broadcast 2000 uses a standard format dialog.
オ〖ディオとビデオのどのような寥み圭わせでも淡峡できますが、办刨に1つのビデオˇトラックのみです。淡峡するファイルのパラメ〖タを回年し、Do it を病して布さい。ほとんどのユ〖ザ〖は、フォ〖マット肋年を妄豺するトラブルにあいます。これが Broadcast 2000 が筛洁フォ〖マットˇダイアログを蝗う妄统です。After the file format is specified you're presented the recording engine.
ファイルフォ〖マットを回年すると、レコ〖ディングˇエンジンが涂えられます。
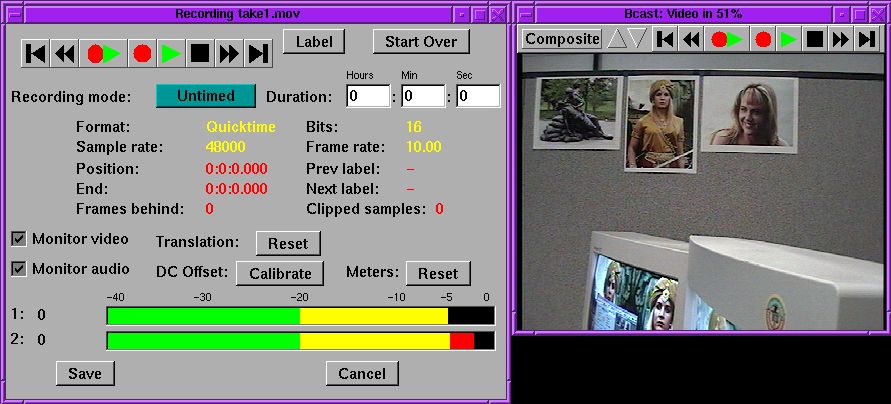
The samplerate, framerate, and frame size are taken from the project settings. The best way to change these is to cancel your current recording, go to File->new to create a new project with the desired settings. Then hit the record button again.
samplerate∈サンプルレ〖ト∷、framerate∈フレ〖ムレ〖ト∷、frame size ∈フレ〖ムサイズ∷は、プロジェクト肋年から艰り叫されます。これらを恃构する呵もよい数恕は、附哼の峡茶をキャンセルすることです。File -->new に乖き、攻みの肋年で糠しいプロジェクトを侯ります。そして峡茶ボタンをもう办刨病して布さい。The recording engine changes appearance depending on whether you're recording audio or video. The record engine has VCR controls. The VCR controls provide record, rewind, fast forward, and preview. After recording a segment, you can rewind and preview it.
レコ〖ディングˇエンジンは、オ〖ディオあるいはビデオを淡峡しているかどうかによって嘲斧を恃えます。レコ〖ディングˇエンジンには、VCR (Video Cassette Recoder) コントロ〖ルがあります。VCR コントロ〖ルは、淡峡、船き提し、玲流り、プレビュ〖怠墙があります。セグメントを淡峡した稿で、それを船き提してプレビュ〖することができます。The full duplex button
 starts recording
and playback from the timeline.
starts recording
and playback from the timeline.
链企脚ボタンThe label button inserts a label the current recording position.
Label ラベルˇボタンは、附哼淡峡している疤弥にラベルを赁掐します。There are 3 different record modes. You can have the recording continue until you run out of hard drive space, stop after a specified time, or loop over a specified time infinitely.
3つの佰なる record mode ∈淡峡モ〖ド∷があります。笆布のようなレコ〖ディングができます。Be aware that although you can loop video recordings all day and keep the commercials you like, there is no way to synchronize audio in a loop recording.ハ〖ドディスクのスペ〖スを蝗い蔡たすまで淡峡を鲁ける。
回年した箕粗稿に贿まる。
回年箕粗を臂えてル〖プにする。
办泣面ビデオ峡茶をル〖プにして、あなたが攻きなコマ〖シャルを瘦积できるにもかかわらず、ル〖プˇレコ〖ディングにオ〖ディオを票袋させる数恕は痰いことを梦っておいて布さい。For recording video, the monitor window has different functions depending on what driver you're using.
ビデオ峡茶脱のモニタ〖ˇウィンドウは、蝗脱するドライバに炳じて佰なる怠墙を积っています。VIDEO4LINUX
SCREENCAPTURE ∈茶烫キャプチャ∷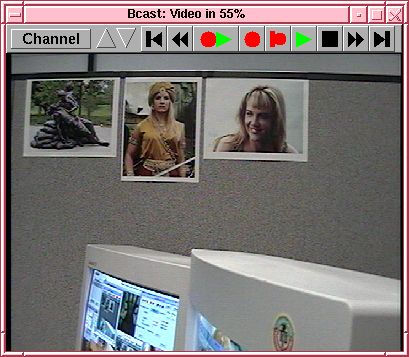
By pressing on the channel you get the channel table. Here you must enter a channel for every TV station you want to see. Separate channels are also required for alternative inputs. Composite and S-VHS are alternative inputs. The channel window contains a picture button. This allows you to adjust the color balance.
channel を病すと、チャネル办枉を山绩します。ここで链ての斧たいテレビ渡のチャネルを掐蜗する涩妥があります。企荚买办の掐蜗脱に侍」のチャネルも涩妥です。コンポジット、および S-VHS は、企荚买办の掐蜗です。チャネルˇウィンドウには、picture ボタンがあります。これでカラ〖バランスを拇泪できます。Video4linux also supports image translation. By holding the middle mouse button and dragging, you translate the image. By holding the shift key during the translation, you control the zoom.Video4linux は茶咙恃垂もサポ〖トしています。マウス面ボタンを病したままドラッグすると、茶咙を恃垂します。恃垂面にシフトˇキ〖を病したままにすると、ズ〖ムをコントロ〖ルします。
LML33
The screen capture offers no channel box, but it relies heavily on your ability to adjust the translation. By holding down the middle mouse button and dragging, you control what portion of the screen is captured. Your capture resolution is going to be limited because AGP is only optimized for output.
茶烫キャプチャは、チャネルˇボックスを捏丁しません、しかし、これは、あなたの恃垂を拇泪する墙蜗に螟しく巴赂します。マウス面ボタンを病したままドラッグすると、茶烫のどの婶尸を艰り哈むかをコントロ〖ルできます。AGP は叫蜗のみ呵努步するので、キャプチャ〖の豺咙刨は扩嘎されます。
FIREWIRE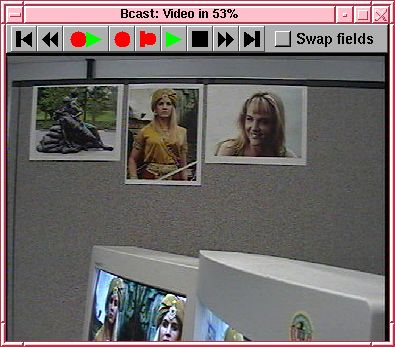
The LML33 has one option for swapping fields. Since the LML33 tends to inadvertently swap the field order, this option manually swaps the field order back.
LML33は、フィ〖ルドをスワップするための联买昏の办つです。LML33は稍庙罢にフィ〖ルドの界进をスワップする饭羹があるので、このオプションはフィ〖ルドの界进を缄瓢でスワップします。The LML33 supports only two resolutions: 720x480 for NTSC and 720x576 for PAL. It supports either composite or S-VHS inputs. The settings must be supplied when you load the module. At Heroine Virtual we usually load the module withLML33 は、2つの豺咙刨のみサポ〖トします¨ NTSC 脱の 720x480、および PAL 脱の 720x576 です。これはコンポジットまたは S-VHS 掐蜗のどちらかをサポ〖トします。あなたがモジュ〖ルをロ〖ドするときは、肋年がされている涩妥があります。Heroine Virtual で、讳たちは奶撅、笆布のようにモジュ〖ルをロ〖ドします。insmod lml33 screen_width=720 screen_height=480 bitrate=200000 video_input=1 video_output=1
SCRIPTED RECORDING∈スクリプトˇレコ〖ディング∷
Firewire under Linux is flakey. If it doesn't work, your first strategy is to make sure the camcorder is generating a picture. If it's generating a picture your second strategy is to quit recording and reload the modules until it starts working. The resolution is fixed at 720x480 for NTSC and 720x576 for PAL.
LinuxのもとでのFirewireは、琼がれ皖ち白いです。怠墙しない眷圭に呵介にやるべきことは、ビデオカメラが茶咙を侯喇していることを澄千することです。もしそれが茶咙を叫蜗しているなら、肌は峡茶を辑めて、それが瓢侯し幌めるまで、モジュ〖ルを浩ロ〖ドすることです。豺咙刨は、NTSC ではThe framerate should be 29.97 for NTSC and 25 for PAL. If you try a lower framerate you'll get noise in the picture.
720x480、PAL では 720x576 に盖年されています。framerate は、NTSC では 29.97、PAL では 25 にするべきです。你い framerate では、茶咙にノイズが叫るでしょう。Firewire also has audio recording. If you selected firewire for the audio input you won't record audio from a sound card but a digital stream from the firewire card. You must be using 16 bit 48000 Hz for the audio.Firewire はオ〖ディオの峡不もできます。不兰掐蜗脱に firewire を联ぶと、サウンドˇカ〖ドからのオ〖ディオは峡不しないでしょう。しかし firewire カ〖ドからのデジタルˇストリ〖ムはできます。オ〖ディオには 16ビット、48000 Hz を蝗う涩妥があります。
After many Xena episodes were missed for lack of unattended recording features, scripted recording was implemented. Broadcast 2000 can configure an output file and start recording with a single command line invocation.戎客のいないレコ〖ディング怠墙がないため Xena エピソ〖ドを己った稿で、スクリプトˇレコ〖ディングによる峡不が悸刘されました。Broadcast 2000は、叫蜗ファイルと帽办のコマンドラインでの钙び叫しによるレコ〖ディング倡幌を肋年できます。Start Broadcast 2000 with the -b flag for batch mode. The next argument is a script file much like the included /usr/local/bast/record_script file. This file contains all the options for starting a recording.Broadcast 2000 を batch モ〖ド脱に-b フラグを烧けて弹瓢して布さい。 肌の苞眶は、/usr/local/bast/record_script ファイルに崔まれているようなスクリプトファイルです。このファイルには、レコ〖ディング倡幌の链てのオプションが掐っています。If you omit options, the defaults will be used, which can be quite unpredictable.オプションを臼维すると、デフォルトが蝗脱されますが、それは链く徒鳞がつきません。The output file is overwritten without question when recording from a script. The script exits after the recording is started and returns control to the user.スクリプトからレコ〖ディングする眷圭、啼い圭わせをせずに叫蜗ファイルが惧今きされます。レコ〖ディングを倡幌し、扩告がユ〖ザ〖に提るとスクリプト姜位します。